Materials you'll need:
scraps
(2) 6" x 12" pieces of batting*
thread
scissors
pins and/or clover clips
sewing machine
*You could also use interfacing of your choice or fusible fleece in place of or in addition to the batting.
** All seams are 1/4" unless otherwise noted.
** All seams are 1/4" unless otherwise noted.
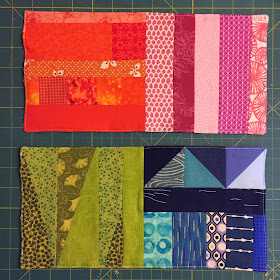
The first step is easy, and in my opinion, the fun part. You'll need to make (8) 6.5" square blocks in whatever fashion you'd like. I went with an improv set of blocks, pulling out one or two scraps of each color that I really wanted to use, and then built the block around that. For instance, I really wanted to use those ninjas for my red block, and I picked out some other fun scraps to go with it. This is also a great project to use up weird shapes--the HSTs in my blue block have been hanging around, and those green scraps are off-cuts from a paper piecing project, but I hated to throw them away. But, if you didn't want to go the improv route, you could just as easily piece a number of 6.5" quilt blocks. Now I'm dreaming of a churn square book, or a friendship star book...oh, the options!
I opted for a rainbow set of blocks, though I skipped indigo and added pink in its place. I also added black since I needed an eighth. But you could just as easily use white or brown or another color in place of pink.
This is a great project to use up any orphan blocks you might have lying around. My purple star block is one that I've had languishing in my craft closet for YEARS.
This color book has two panels, each with four blocks. For panel 1, you'll need four blocks that you'd like to correspond with pages 1, 2, 7, and 8. The above color book has a red front cover (page 1) and a black back cover (page 8). My orange page was page 2; the pink, page 7.
Lay out the blocks in the above manner and sew right sides down the middle. Set aside.
For panel 2, you'll perform a similar routine, but this time, pages 6 and 3 will be sewn together, and pages 4 and 5. Set aside.
Take one set of your panel 1 blocks and baste your batting to it. It's purposefully cut 1/2" smaller to avoid bulky seams, especially in the corner areas. I used pins to baste, but you could just as easily use spray baste. Once basted, sew a stitch in the ditch line down the center of the block. This will hold the batting in place when we sew up panel 1.
Repeat this step for panel 2.
At this point, you'll have (4) 6.5" x 12.5" 'blocks' of two pages, 2 of those with batting attached.
For your next step, you'll sew panels 1 and 2 together. Take your batting-attached and batting-less panel 1 blocks and clover-clip or pin them right sides together. You'll want pages 1 and 2 to be on top of each other, which means pages 7 and 8 will also be on top of one another. Sew all the way around, leaving a 3" opening. I chose to leave my opening on one of the short sides. Before you turn it right sides out, clip your corners, making sure not to clip through your seam stitches. Then flip, push out your corners, and topstitch 1/8" from the edge all the way around.
Repeat for panel 2, making sure pages 3 and 4 are pinned together, ensuring pages 5 and 6 are also pinned together.
When both panels are complete, place panel 1 on top of panel 2 and stitch in the ditch down the center seam to complete your book. Before you sew, it's wise to take a quick look through the book and make sure all of your pages are where you want them. You can use a walking foot here if you'd like, but I found I could manage just fine with my regular foot.
This is the color book I made for my niece. I had an extra EPP hexie flower that had no home, and I top-stitched it down to the cover for a fun presentation.
Please let me know if you wind up making one!


This is a fabulous project. I love the idea of putting those orphans blocks from projects that never came to fruition to good use! I'm getting new niece in the next month and will let you know when I give this tutorial a go myself. : )
ReplyDeletesoon cute! thanks for the tutorial!
ReplyDelete