Showing posts with label tutorials. Show all posts

Saturday, April 1, 2017

Stripey Stripe Block Tutorial


Hello Glitterati Royalty! Thanks for joining me for this next stop on the Honey Pot Bee Tour. I'm so excited to share my block with you--the Stripey Stripe Block.

If we haven't met before, my name is Audrey, and I've been quilting for about five years. I'm a homeschooling mama of four kiddos, including a four-month-old baby. As you can probably guess, I am totally in love with hot pink! Because of the aforementioned four kidlets, posting around these parts has been sparse of late, but I'm on instagram a whole bunch!

On to the tutorial!


Materials

Fabric A (3) 1.75" x 16" strips
Fabric B (3) 1.75" x 16" strips

Makes (1) 10.5" block.


Step 1
Sew your A and B strips together to form AB pairs.


Step 2
Sew the three AB strips into one panel. This will measure 8" x 16".

I don't use a lot of starch in my sewing adventures, but in this case, I starched my finished panel before moving on to step 3. We're about to slice and dice it and sew up some bias edges, and I found the starch kept everything crisp and neat.


Step 3
Using a rotary cutter, cut the 8" x 16" panel in half to form (2) 8" blocks.

I'm not gonna lie, at this point in the process, I considered just stopping here as I think these blocks are super fun on their own. But this tutorial would've lacked some serious spice, so I pressed on.


Step 4
Take an 8" block and cut a diagonal line down the center. You can use your ruler and rotary cutter and line it up yourself, or you can line up the corners of your block on the oblique line on your cutting mat and use that as your guide.


This will net you two triangles. Repeat with the other block, but make sure to cut them in the same fashion! In the end, you'll have four triangles.


Step 5
Flip your triangles around until your block takes shape, then sew it up! Each 8" block from step 3 will give you a triangle with a long fabric A strip and a long fabric B strip, so be sure to sew them up alternating A and B.


Step 6
Trim to 10.5".


Other Stripey Stripe Versions

Now, there are probably a kajillion ways you could customize this block and call it your own if the style above doesn't suit. My first rendition of this block was a scrappy explosion of color using leftover strips from my Gypsy Wife quilt. Those 1.5" strips were perfect for this.


I sewed and sewed until I had a scrappy panel, then followed the above steps. I found the use of starch particularly helpful with this version.

Some other options would be to use bigger or smaller strips, strips of different sizes, more or less strips. You could use three or six different colored strips. Go wild! Just remember that the width of your block needs to measure half of the length of your block.

That's it! I can't wait to see what y'all crazy talented people come up with!

Monday, January 18, 2016

Color Book Tutorial.

My youngest niece is about to turn 1, and for her birthday gift, I revisited the idea of a color book. Then, after dropping one in the mail for her, I thought my own baby kidlet should have one, and why not take some pictures and share how I put it together with you?


Materials you'll need: 
scraps
(2) 6" x 12" pieces of batting*
thread
scissors
pins and/or clover clips
sewing machine

*You could also use interfacing of your choice or fusible fleece in place of or in addition to the batting.
** All seams are 1/4" unless otherwise noted.


The first step is easy, and in my opinion, the fun part. You'll need to make (8) 6.5" square blocks in whatever fashion you'd like. I went with an improv set of blocks, pulling out one or two scraps of each color that I really wanted to use, and then built the block around that. For instance, I really wanted to use those ninjas for my red block, and I picked out some other fun scraps to go with it. This is also a great project to use up weird shapes--the HSTs in my blue block have been hanging around, and those green scraps are off-cuts from a paper piecing project, but I hated to throw them away. But, if you didn't want to go the improv route, you could just as easily piece a number of 6.5" quilt blocks. Now I'm dreaming of a churn square book, or a friendship star book...oh, the options!

I opted for a rainbow set of blocks, though I skipped indigo and added pink in its place. I also added black since I needed an eighth. But you could just as easily use white or brown or another color in place of pink.

This is a great project to use up any orphan blocks you might have lying around. My purple star block is one that I've had languishing in my craft closet for YEARS.


This color book has two panels, each with four blocks. For panel 1, you'll need four blocks that you'd like to correspond with pages 1, 2, 7, and 8. The above color book has a red front cover (page 1) and a black back cover (page 8). My orange page was page 2; the pink, page 7.

Lay out the blocks in the above manner and sew right sides down the middle. Set aside.


For panel 2, you'll perform a similar routine, but this time, pages 6 and 3 will be sewn together, and pages 4 and 5. Set aside.


Take one set of your panel 1 blocks and baste your batting to it. It's purposefully cut 1/2" smaller to avoid bulky seams, especially in the corner areas. I used pins to baste, but you could just as easily use spray baste. Once basted, sew a stitch in the ditch line down the center of the block. This will hold the batting in place when we sew up panel 1.

Repeat this step for panel 2.

At this point, you'll have (4) 6.5" x 12.5" 'blocks' of two pages, 2 of those with batting attached.


For your next step, you'll sew panels 1 and 2 together. Take your batting-attached and batting-less panel 1 blocks and clover-clip or pin them right sides together. You'll want pages 1 and 2 to be on top of each other, which means pages 7 and 8 will also be on top of one another. Sew all the way around, leaving a 3" opening. I chose to leave my opening on one of the short sides. Before you turn it right sides out, clip your corners, making sure not to clip through your seam stitches. Then flip, push out your corners, and topstitch 1/8" from the edge all the way around.

Repeat for panel 2, making sure pages 3 and 4 are pinned together, ensuring pages 5 and 6 are also pinned together. 


When both panels are complete, place panel 1 on top of panel 2 and stitch in the ditch down the center seam to complete your book. Before you sew, it's wise to take a quick look through the book and make sure all of your pages are where you want them. You can use a walking foot here if you'd like, but I found I could manage just fine with my regular foot.


This is the color book I made for my niece. I had an extra EPP hexie flower that had no home, and I top-stitched it down to the cover for a fun presentation.


Please let me know if you wind up making one!

Thursday, November 14, 2013

Handmade Holidays

Are y'all following the Handmade Holidays series at Sew Mama Sew? It is serious awesomesauce, and I've already bookmarked a handful of tutorials. (Rocking Shoelaces, anyone?)


If you have been following, you may already know this, but my Sewing Tool Organizer Tutorial was up on Tuesday's Handmade Holidays post. Woo! If you're looking for something to make, but you aren't sure what, I'd definitely recommend this series. Yesterday, I discovered the awesomeness that is Wild Olive, and I'm sure before the month is out that I will be following several more blogs and considering several other projects! Yikes! Maybe this is a bad idea...NO! Except, it's a really really good one. Go check it out!

Friday, January 4, 2013

And there was much squeeing!

Friends, I know I told you I was taking a bit of a break from the blog because I'm moving, will be away from Agatha for a couple of weeks, and I'm visiting my BFF, but yesterday, an email appeared in my inbox that elicited so much excitement, I couldn't wait to share it with you!

Photo is courtesy of Alisa from Knit-Spin-Quilt.

BAM! Isn't it glorious? Alisa from Knit-Spin-Quilt used the quilt I designed for the Let's Get Acquainted blog hop to make her very own Baby K Quilt. Woo! There aren't words to describe how awesomely cool this is for me.

Photo is courtesy of Alisa from Knit-Spin-Quilt.
Doesn't the quilting just look yummy on fleece? I've seen flannel backings, and I've seen minky backings, but I don't know that I've seen a fleece one before, and I love how clear the quilting lines appear.


And here is a picture of my version, just in case you forgot. :)

Okay! Back to vacation. I'm itching to sew, what with two blocks for the Lucky Stars BOM waiting in my inbox, two bee blocks to attack, the Sisters' 10 BOM--which I wasn't sure I'd have time for, but I've decided to give it a go anyway--and this new scrappy trip along shenanigans that everyone seems to be doing. Oh, Agatha! We'll be together again soon!

Friday, November 2, 2012

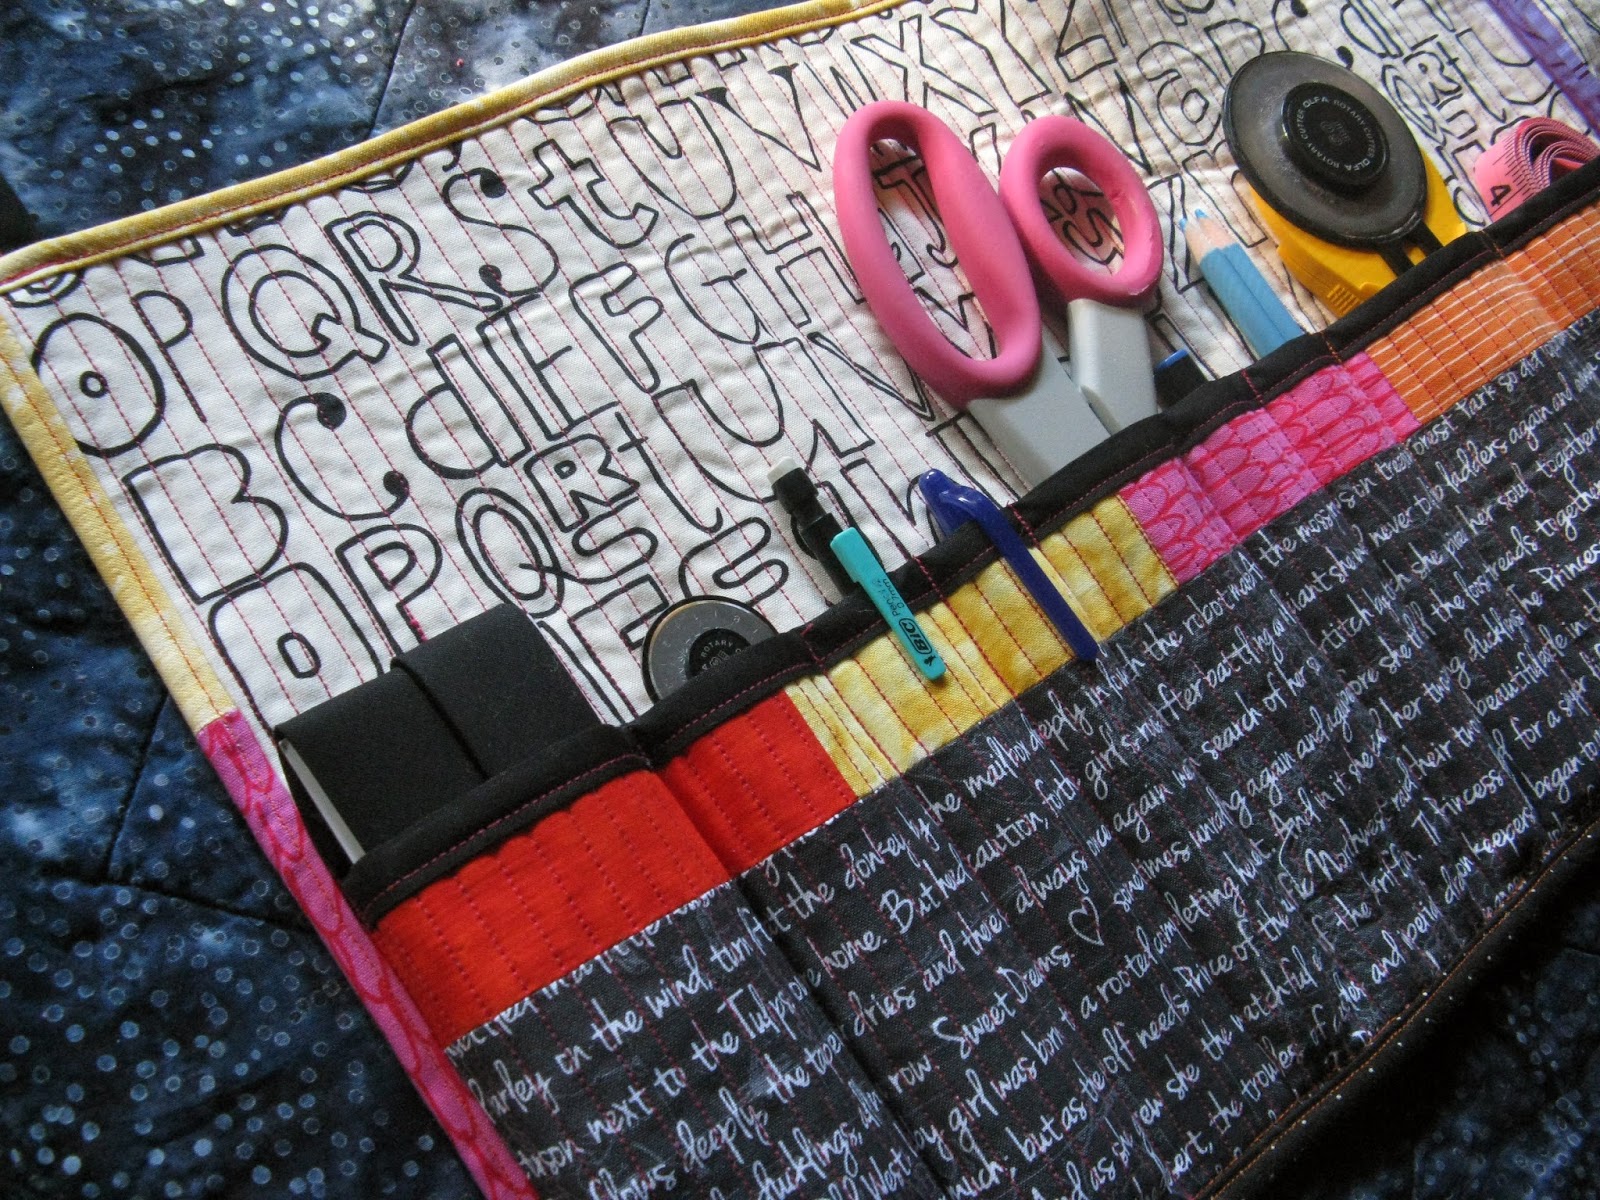
sewing tool organizer tutorial.


I have two small kidlets, and while my youngest is just now starting to move around and get into things, my oldest is a serious artiste when it comes to obtaining items that I thought were out of his reach. I had taken to storing all of my quilting and sewing tools on a high shelf in our linen closet to prevent the little mister from playing with my measuring tape, etc. However, my quilting time usually comes in spurts, and I really hate pulling out and putting away my tools eight times a day. Enter: The Sewing Tool Organizer. Once my husband puts some nails in the wall for me, this baby will hang from the wall, and everything will be easy-access.

I customized this to fit my sewing tools, and I will provide the measurements I utilized, but it's easy to customize for your needs, and I strongly encourage you do. Also, in the grand tradition of Audrey tutorials, this how-to assumes you have a basic knowledge of sewing, quilting, and the jargon that comes with the turf. If you have any questions, please feel free to ask them in the comments, and I'll do my best to answer or direct you to other resources.

Materials Needed: 
(1) 11" x 20" fabric, aka, Panel A*
(1) 5.5" x 24" fabric, aka Panel B**
(2) pieces of backing fabric, large enough to accommodate the above fabric panels
(2) pieces of batting, large enough to make a proper quilt sandwich with the above fabric
fabric for binding
14" of bias tape (or other hanging loop material)
coordinating thread
20" dowel rod (optional)

*Feel free to make your panels as scrappy (or as sparse) as you'd like. For my 11" x 20", I used one continuous piece of fabric. For the 5.5" x 24", I used scraps to border the top. 

**The 24" measurement in Panel B is entirely dependent on the number and depth of the pockets you'll be creating. I laid out all of my tools and took a guess that thankfully ended up being long enough, but if you're sewing a lot of deep pockets, tack on another few inches, just to be on the safe side.


Make a quilt sandwich Panel A, then quilt in whatever fashion pleases you, but may I recommend dense straight line quilting? It serves two purposes: one, it provides lots of structure to the organizer, and two, it makes lining up and sewing your pockets easier. I used my 1/4" presser foot and lined it up with the previous quilting line. From there, it was a lot of turning back and forth.


A LOT of turning. 


Then, make a quilt sandwich with Panel B. Quilt. Again, I straight line quilted this bit to make for easy pocket sizing. Trim the excess backing and batting from your quilt sandwiches.

Prepare 24" of binding and sew it to the top only of your 5.5" x 24" quilt sandwich.


Now, here's where it gets tricky. If you haven't already laid out your tools and decided where you'd like what, do it. Try to balance out the weight of your tools so that one side isn't bearing the brunt of everything.


Place the wrong side of Panel B on top of the right side of Panel A. Match up the bottom left corners of your two quilt sandwiches, and pin the edge.

Sew your two left edges together--1/4" from the edge. Don't worry about the exposed fabric--we'll be putting binding over the entire thing.


Place your first tool up against that freshly sewn line, and, using the quilting lines on both sandwiches as guides to a perfectly straight line, and keeping the tool (in this case, a pen) in place, pin on the right side to form a pocket.


Remove tool and sew the pocket in place. Before moving on to the next pocket, double-check that your first tool fits comfortably inside the pocket. Don't worry about the open bottom--we'll take care of that later.


Repeat with your other tools until you've finished making pockets. When all of your pockets are complete, trim off any extra fabric you might have from the 5.5" x 24" panel. In my case, I trimmed a little under an inch.

Now, it's time to bind and polish off this baby! First, sew down the bottom edge of your two quilt sandwiches. Because your pockets have some depth to them, there will be some bunching of fabric, and try to spread that out evenly along each pocket to keep them neat.

Prepare enough binding to wrap around the larger rectangle, and attach. I usually handstitch my binding to the back of my quilted item, but in this case, I knew I was looking at several layers of fabric and two layers of batting, so I machine stitched my binding to the back, wrapped it around to the front, and machine-stitched it in place there too. I have been told that the more you practice with this, the neater it will look.


For my loops, I first top-stitched my bias tape, then cut it into (4) 3.5" strips. I folded each in half and secured them equidistantly across the top edge. Insert the dowel rod into your loops and hang, then marvel at your genius ability to outsmart curious toddlers!


As I mentioned before, post any questions in the comments section, and I'll do what I can to answer them. (And pretty pretty please let me know if you wind up making one of these for yourself!)

LinkWithin

Related Posts Plugin for WordPress, Blogger...