Showing posts with label gifts. Show all posts

Saturday, June 30, 2018

Finished Magnolia Mystery Quilt


BAM. It's done, and none too soon, as it was a gift for my super awesome good friend L, and I am so excited that after working on it for A YEAR, I finally got around to finishing it and sending it along its way. Spoiler alert: she loved it!


This is the Magnolia Mystery Quilt from Cheryl of Meadow Mist Designs. This is the second mystery quilt that I've finished by Cheryl, and I LOVE them both. I'm a bit ashamed to tell you the first one STILL isn't completed, but it's waiting longingly for its time to shine. One of these days....


I kept it simple and straightforward with this one's quilting. Black stipple in the batik areas, and straight line quilting in a lime thread through the blocks. Woulda shoulda coulda gotten a picture of the back to show you the yum lime against the super awesome Grunge dot print, but I didn't. Lately, it's a struggle to remember my first name!


I so enjoyed making this quilt, and I am so pleased to know my friend loves it. She has been such an important influence on me, and I was thrilled at the idea of gifting her something that I made with my own two hands.

I'm going on seven years of quilting now, and there's something still so magical about that!

Monday, January 8, 2018

Tula Pink Patina Quilt Top


Friend, last time we chatted about this Patina Quilt project from the book Quilt with Tula and Angela, I had just begun piecing all of the strips. There was piecing, then more piecing, then more piecing! All.The.Piecing. By the time I finished piecing, I was thoroughly OVER IT, but then I sat back and looked at it and ooohed at the prettiness of it all.

I took this photo back in SEPTEMBER. I basted it in October. I started quilting it in November. And then I'd work on it between holiday gift-making and holiday prep, and then, just when I thought I could start working on it again with some serious dedication, I wrenched my shoulder somehow, and wrestling with this lovely and my sewing machine, Stella, seemed like a terrible idea. (And I found out it was because I'm stubborn and didn't want to be inconvenienced by hurt shoulders so I sewed anyway, and after ten inches, my shoulders were a world of pain, so I stopped and crashed on my couch with a heat pad.)

My shoulders are feeling (mostly) better now, though I'll admit that I'm hesitant to pick this quilt up again just yet as I don't want to re-injure them! But hopefully I'll be able to get er' done soon. As of right now, I'd say I'm about 1/3 done with the quilting, which I'm calling a MAJOR success.

This bomb cyclone thing and its terrible weather rendered us housebound for a few days, and while that was super lame, I *did* manage to get another quilt not only basted, but quilted! The binding is even picked out--though not prepared--so hopefully I'll be sharing that with you soon.

Monday, December 18, 2017

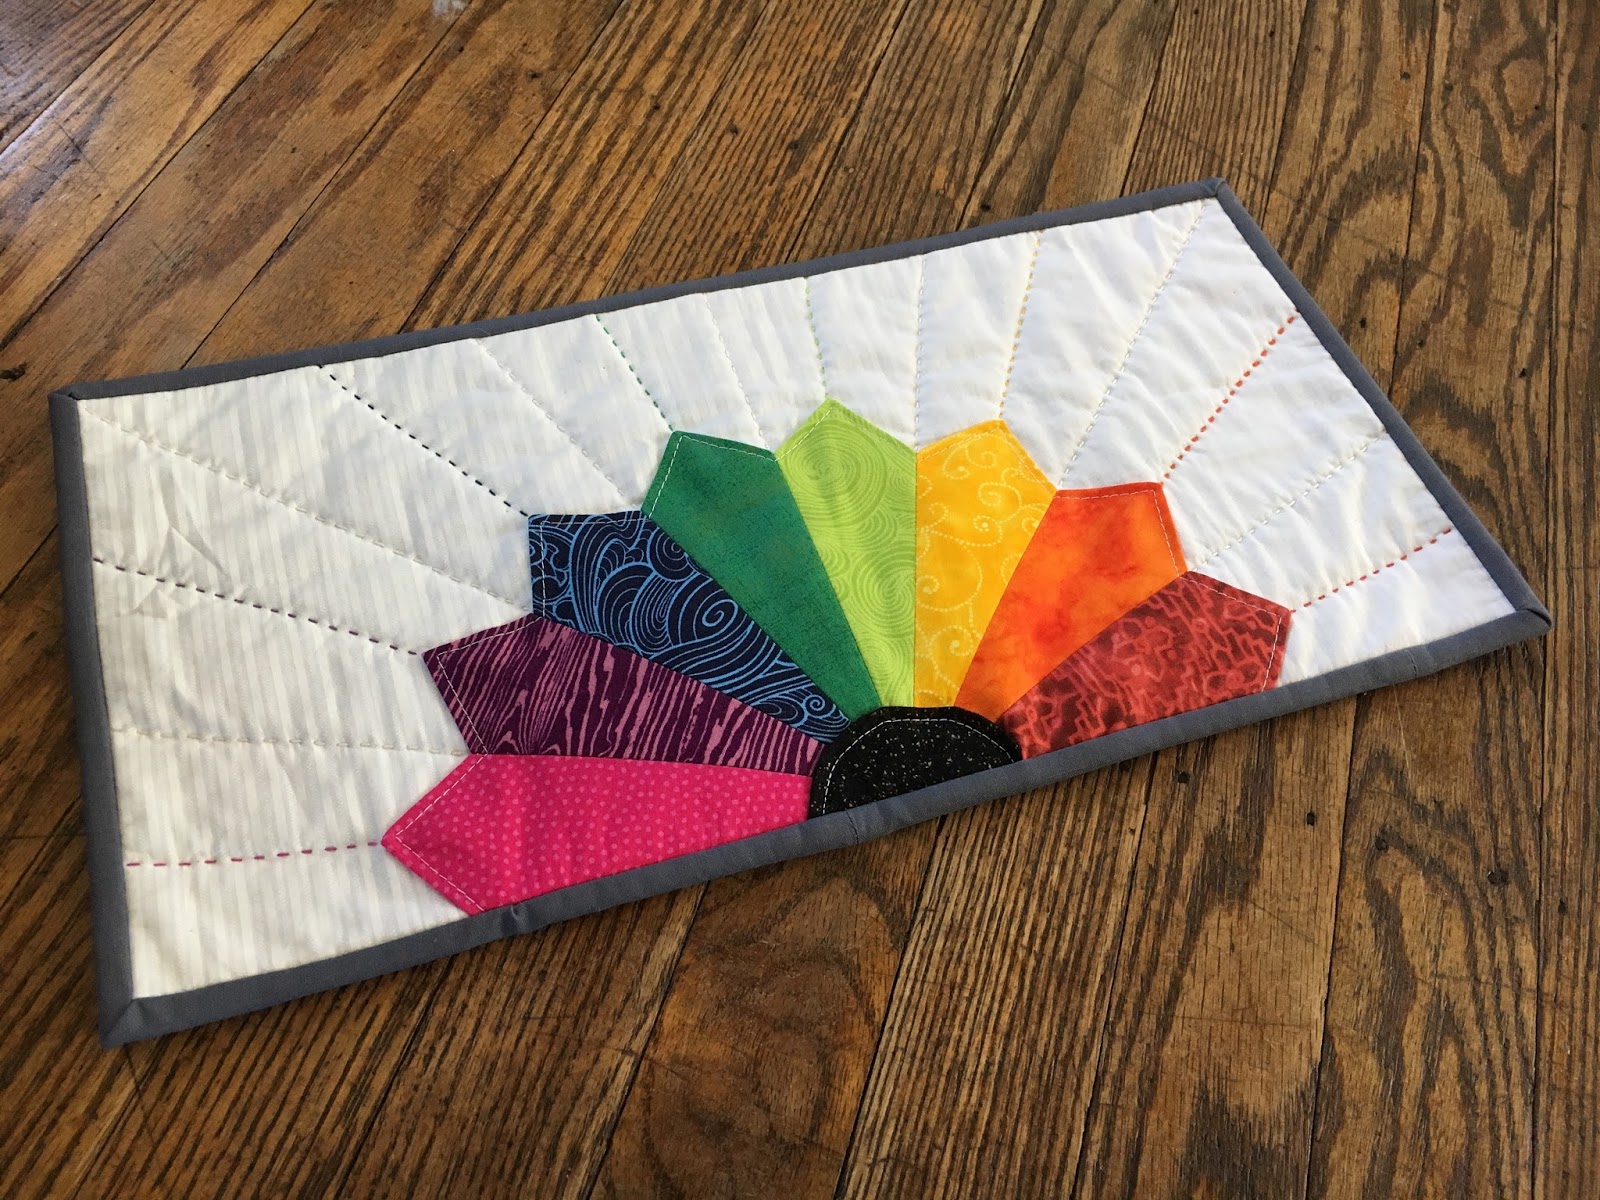
Rainbow Mini Quilt

We'll just gloss over the fact that I've been gone for like three months, mmmkay? Because it essentially boils down to four kids, homeschooling two of them, lots of husband-being-out-of-town, computer problems, Christmas planning, swimming lessons, gymnastics classes, and the occasional sewing. The good news is that I have a healthy backlog of things to share with you, and I'll hopefully have time to get a few posts up, woo!


Like a million years ago, I pieced some half-dresdens for a quilt I made for Susan for the Coast to Coast Traveling Bee. (Spoiler alert: C2C will be starting again soon! Also, just realized I never shared my finished quilt top, which is a total SHAME because it's amazing. Gotta remedy that soon.)


I had planned to make this mini for me. But the farther along I got in the planning process, the more I felt like this would make a super sweet birthday present for my awesome friend, K, soooooo...


I finished it up and sent it her way. I hand quilted this using Aurifil 12 wt. thread with the exception of the white which is a DMC perl cotton. Fabrics were from stash.


Monkeys on the back!

Monday, March 13, 2017

Baby E's Northern Lights Quilt


You could say I'm a fan of Jaybird Quilts' Northern Lights pattern. You could say that, and you would be right since this is my FOURTH time making this particular quilt! But this is the first time I got to make one for a girl, and I really enjoyed this fabric pull.

I had originally tossed around some other quilt pattern ideas, but I made a Northern Lights quilt for Baby E's cousin, so it seemed fitting that I make one for Baby E too.


And while this is my fourth time making this quilt pattern, it's the first time that I actually did something fun with the quilting, which is kinda shameful, but we'll ignore that. For the first three, I echo quilted the lightning bolts. For this one, I added some FMQ spiky stippling. I purposefully chose Kona Charcoal for the background so that the bobbin thread would be really noticeable and scrumptious.


And here's a better shot of the quilting. I also chose to bind this quilt in Kona Charcoal, which I think lends it a nice frame.

This is my fifth finish from my Q1 FAL list, and my first quilt finish. I have another baby quilt up next to finish, and then NO BABY QUILTS for awhile. Exciting!

Monday, February 27, 2017

H Pillow


I finished up this pillow last week (or maybe the week before that--yikes!) and I'm so happy with its cuteness!


A few years ago, I made an L pillow for one of my sons' friend's birthday. And apparently, Miss L's little sister was so enamored by the pillow that she kept asking when she would be getting her own H pillow.

Her mama contacted me to see if I could knock one of these out for her birthday, and how could I say no? It especially doesn't hurt that Miss H is a serious cutie patootie.


The construction wasn't terribly complicated. I cut a 14.5" square panel out of that fun chevron print I bought ages ago with plans to use it for my niece's quilt. It didn't work out with my plans for my niece, but this is a super awesome use of it! I basted it, and FMQ'd it all together. I almost never stipple, but this seemed like a fun time to use that particular FMQ pattern. After that, I cut out two H's, sewed them together, leaving a space along one of the sides, then turned it right side out. It needed a good press, then I topstitched it down to the panel, using a turquoise thread because I thought it would add a bit of flavor.

The back is an envelope closure, in keeping with the L pillow I made a few years ago.


I'm so excited to pop this in the mail for Miss H! Happy Monday, Friends. I hope your last few days of February are stellar!

Monday, January 30, 2017

Sew Together Bag for K


Just in case you haven't had enough Sew Together Bag goodness, here is another one for your viewing pleasure! I made this bag for my quilting sensei K, and I'm kinda in love with it. It is a sign of how much I value our friendship that I sent it along.


I tried to go more demure, but the Audrey in me kept coming out. Even though it's not pink, there is probably no mistaking who made this bag.


I made this one assembly-line style along with the one I made for my friend L, and let me tell you, I got to be a machine when it came to the zippers. This is some of my best zipper work, y'all. Just sayin'.


And the two bags side-by-side. I love both of them! And I'm glad to have two more under my belt. This is finish #3 from my Q1 FAL list, woo!

Thursday, January 26, 2017

Sew Together Bag for L


BAM! Finish #2 from my Q1 FAL list. If you take into consideration that this is a super late Christmas gift, it's not as impressive of an accomplishment, but I'm going to take the optimistic angle of looking at it and go with super awesome!


This is my third Sew Together Bag, and I'm getting better. I've pretty much figured out how I like to do things at this point, and I went with it. The outside is a scrappy blue QAYG panel. It was fun to use some of my favorite prints in this panel, including my most favorite batik ever. Yes, I used the "b" word, but sometimes batiks are yum!


And the inside is some woodland prints! I had a lot of fun making this, and I hope my friend L can put it to good use.

In a few days, I'll be showing your my fourth Sew Together Bag, woo!

Friday, January 20, 2017

FF: Star Pillow


A few moons ago, I made a quilt for my dad with the aid of the lovely ladies of Stash Bee hive 8 from 2015. I wound up with one extra quilt block, and as I knew my dad intended to hang the quilt I made for him on the wall, I didn't want to put it on the back where it would never see the light of day. The solution? A pillow cover!

This block, by the way is the Glorious Autumn Star block from Fresh Lemons Quilts.


Over the course of a couple of weeks, I slowly added two borders to the original 12" block. I'm not gonna lie, this is a LOT of white for me. (I find this really amusing because I know a lot of people would be totally comfortable with this amount of white, but to me, it's intense. Terrifying, even. What kind of quilting dare I use? Can I handle the white? Most important: can I keep it away from my children??

I decided pretty early I was going to FMQ this bad boy, but it wasn't until I sat down and started sewing that I figured out what kind of designs I wanted to use. The pebbles in the center star seemed smart, but I have had a messy time with pebbles in the past, and did I really want to go through that again? I decided to give it a go--aren't pillow covers meant to be a good testing place for FMQ?--and I'm happy to report that it went well. Then came some infinity loops, and I finished off the outer white border with straight line quilting. I briefly considered doing feathers there, but the border is only 2", and I wanted a bit more space to do them justice.


Here's the weird thing: the more time I spend on actually quilting my stuff, the more I LIKE it. I used to DESPISE the quilting bit. Straight lines, echo quilting, get it done, baddaboom. And when I first started FMQ, I was so depressed. It looked horrible! I'm not saying it looks genius now, but it looks a whole lot better than my first attempts, and I guess I have to 'fess up that when peeps say it will get better with practice, they're telling the truth.

(And can I just say that the texture of this cushion is amazing? It just feels so cool!)


I backed this pillow cover with a simple envelope closure using a leftover striped sheet of my dad's. I'll be sending it off to him as a super late Christmas gift. Also, this is finish #1 from my Q1 FAL list, and I'm excited to report that I have not one, but TWO more finishes to share with you. Woo!

Tuesday, December 6, 2016

Ramona Flowers Bag.

Earlier this fall, a box showed up in my mailbox from my friend L. I knew it was my birthday present, and I knew she had spent a complicated and lengthy time concocting it, but I had no idea what the contents would be. When I opened it, I pulled out a bag and immediately started crying.


Pretty sweet bag, right? And it's definitely something I would rock, but that's not the reason I started crying. I started crying because I had wanted to cosplay as Ramona Flowers for Free Comic Book Day back in May, but after doing some quick research, I realized I would absolutely have to have Ramona's magical bag of magical bagness, and there was no way I was going to pay a kajillion dollars for one that someone else had made, and there was no way I was going to make one in the very limited time I had, so Ramona Flowers was off the table, and I figured I'd have plenty of time to figure out the bag before next May.

Except L did that for me. Cue crying.


Did I mention the bag is reversible? I don't even know how she figured it all out, but she did. This is her creation, and it probably took her a million years to make, and how do you say thank you and worse, what do you make/get her for her birthday next month? Eep! (I have some ideas....)


And while it's only December, I need to start working on my Ramona dress. Because if I have a bag this year, I better make sure my outfit it totally epic. (AND IT WILL BE.)

So thank you, L, for my awesome bag of magical Ramona bagness. And thank you for being such an awesome friend. I heart you mucho.

Wednesday, October 19, 2016

Boo's Sew Together Bag


I made another Sew Together Bag! And it was way easier! Yay!

My sister has a November birthday. Since I might feasibly be having a baby on her birthday, it seemed prudent to finish up her gift early. My sister has a serious love for gray and yellow, so I cut into my cherished Echo fabric to make her a Sew Together Bag. (You know you love a person if you're willing to cut into your Echo.) When I first started quilting, Echo was one of the first collections to catch my eye, and working with it reminded me of my early days of quilting.


And this is the finished bag. I changed a few things from my first sew together bag, and I don't think I'll repeat any of them. Good experiment, but not what I wanted, you know? On the one I made for my husband, I used home dec scraps and duck cloth for the exterior, which already gave it support. The added batting further stabilized it. For this one, I used quilting cotton and batting for the main panel, but I also used batting to support the side pieces, hoping it would be enough. It works, but they are a little floppy--not the crisp edges that my husband's show.

I chose not to interface the pockets because interfacing and I are involved in a major feud at the moment, and I was using a light yellow fabric that I didn't want to scorch like the fabric I scorched the last time I tried to use interfacing. The outer zipper and batting give it enough structure to keep the bag from flopping over, but it is floppier than my first. Apparently forgetting the interfacing isn't an option for me, at least not when using quilting cottons.

My last change was how I attached the binding to the bag. On my first, I sewed it first to the interior, then onto the front. For this one, I sewed it first to the exterior, then onto the inside. I will definitely sew it first to the interior next time as I really appreciated how much cleaner the binding looked on the exterior of the bag.


The inside is lined with a yellow polka dot that was from my grandmother's stash. I thought my sister would appreciate the family touch, and she had better as I used up all of it on this bag! But it's such a happy fabric too, and I think it gives a nice touch to the interior. And I purposefully used a hot pink zipper so that every time she opens it, she'll think of me! (But I left it on the inside as I know it's not her favoritest color in the entire universe, which seems a bit crazy to me--who doesn't love hot pink as much as I do??? Honest answer: pretty much everyone.)

This is my first finish from my Q4 FAL list. At least I managed to knock one thing off before Vanilla makes her appearance!

Friday, October 14, 2016

Vanilla's Symphony of Pink.


(I have meant to write this post for days. DAYS, friends.) Isn't this the sweetest little pink quilt ever? And given my love of pink, you might be inclined to think this beauty came from my own hands, but no! She's the clever work of my lovely Stash Bee 2016 hive. This is my third year hive mama-ing, and this year I almost feel unnecessary as my hive is mostly self-sufficient and awesome and stuff. And then they're super lovely and make a gorgeous quilt for my little Vanilla bean. The back is a soft flannel, and it has the most gorgeous embroidered label with everyone's name. When I received it in the mail, I totally cried, right in front of my houseguests, and when my husband saw it, he loved it too! I promise I'll get a shot of baby snuggled in her quilt when she arrives and send it on to you hive mates!

This quilt is so special to me, and I am so grateful to my awesome hive. I had grand plans to photograph it, but I'm hoping y'all will forgive me when I plead a giant belly and third trimester pregnancy and stuff. I promise, I'll only use that excuse for another few weeks. Then I'll start in on the new baby excuses! Just kidding.

Monday, August 22, 2016

A Sew-Together Bag (The First? The Last?)


OMG, I finished a Sew Together Bag. This bag pattern has been around for awhile, and I've seen probably a million gorgeous lovely versions, but this is the first one I've made. I had grand plans to sew some up as birthday or holiday gifts, starting first with my husband.


Last year, I made my husband a messenger bag. Since I was kinda making up things as I went along, I bought a bunch of fabric and crossed my fingers that I would have enough. (And oh, did I!) I've since made him a lunch bag from the same set of fabrics, and now this sew together bag. He uses both almost daily, which of course makes my heart squee. I don't think he'll be using this one as often, mostly because I constructed it for use as a toiletry bag. Probably 2-4 times a year, he goes on an epic trip for work--often internationally because he's a punk and gets to go cool places--and he needed a new toiletry bag. His birthday is next month, so I thought I'd cross this one off early and call it good.


And boy, am I glad that I did. I wouldn't call this pattern hard--it's just fiddly. Though I will say I pretty much followed this sew-along from The Quilt Barn and only referenced my pattern when absolutely necessary. I found the tons of pictures of the sew-along much easier to follow than the pattern itself.

Of course, my husband happened to walk into the house as I was assembling the final product, took one look at the bag and said, "Hey, that matches my bag!" And then he got excited. So I gave it to him early because he already knew it was for him even though I didn't say anything. And it was awesome because he just keep looking it over and over again, seemingly shocked that I could make something like this. Ha! Bag success!


My version is far from perfect. I love it and it's fine, but I guess I'd say some areas are a little sloppier than I'd like. And interfacing? OMG, I wanted to cry because my interfacing drama just seems to get worse the more I use that stuff.

The pockets may seem a little wild, but I knew my husband would appreciate the ninjas and craziness. Sometimes I feel like our lives are ninjas and craziness. It's fitting. And, added bonus, it used up weird random scraps.


I also am not super pleased with the placement of the lions. At this point, I only have a bit of lion fabric left, so I used what I had. But even when I expressed my disappointment to my husband, he pointed out that it looks like the lions are peeking out, and he said he liked it.

I kinda think he's the best. So here's a happy birthday present to my husband! I thought it would also be lovely to finish up the negroni shirt I've promised him, but I really REALLY need to start working on my daughter's quilt. In my defense, I had to order some fabric, but it's here now, and there are no excuses! Get to work, Audrey!

This is finish #7 from my Q3 FAL list. And with the weekend's fabric order arrival, I'll hopefully have the supplies I need to finish off or make good progress on a couple of the other items on that list. Conquering all sixteen is probably not a tangible goal, but I've never let that stop me in the past!

And I'm linking up with TGIFF over at Anja Quilts, which is super fun because she also finished a Sew Together Bag!

Friday, August 19, 2016

FF: Stash Bee 2016 Quilt, Woo!


I have another finish in the books, and none too soon. This quilt has been sitting around, basted, taunting me. Demanding attention. And I would have loved to give in to its demands, but I couldn't as I had NO IDEA how to quilt this bad boy. PS-Thanks to EVERYONE on IG who chimed in with ideas. It's part of what makes IG grand, and I am so thankful for a helpful, constructive community. (But we already know that quilters are the best sort of people.)

Brief introduction: this is a quilt using blocks from Stash Bee Hive 5. I'm not gonna lie, this is an impressive set of individuals. (I am totally not biased, even if I am the hive mama.) The block is called the Five Crosses, and if you're interested in making it, I wrote up a Five Crosses block tutorial because I couldn't find one anywhere!


Last week, I pulled my quilt sandwich down and spread it out in my kitchen. (It seemed like the perfect time--I had actually mopped my floors!) I marked it up with my hera marker. I considered FMQ. I added magenta painter's tape. I went through five or six ideas before rejecting them all. And what I kept coming back to was straight lines, two inches apart.

But it seemed boring. Not necessarily that it would look boring, but really boring to quilt up. So I opted to shake things up and did the straight lines in quarters, rotating the lines every time I moved on to a new quarter. (I used a combination of my hera marker and the guide on my walking foot.) I'm not sure you can see very well from the above photo of the quilt's center, but half of the lines are horizontal, and the other half are vertical.

After I quilted it, the quilt looked kinda crummy. Not gonna lie. It rippled a bit, which was distressing to say the least. And the back...well, you can kinda see what happened in the pic below.


The backing fabric misbehaved in the extreme. Although, my husband mentioned that he actually thinks the waviness of the back is super cool--I dunno, but whatevs. I will say that once I washed the quilt, it decided to get with the program, and now it lays flat, thank goodness. The washing machine seems to have kicked the ripple out of its ornery system. The back is what it is, but I can live with it.

The blocks I received were a mishmash of serious fun, and I sashed it up using a green Grunge fabric. The outer border is also Grunge--not sure which blue. And I bound it up using leftovers of the green Grunge and a bit of green and white stripe I had leftover from my recent Night Sky finish. I thought this would be a good option for machine binding, plus I used my zigzag stitch to finish it, which is always super fun.


I've been trying to take my quilts out and about and photograph them in fun places, but with the heat index hitting 105 and 109 degrees F, well, I haven't been much interested in leaving my house, especially not third-trimester preggo with three littles in tow. So I thought I would take some photos of this one around my house, leaving things much as they are. It is not uncommon to find trucks and duplos and random shoes strewn about the place. It's also not uncommon to find toddler feet on quilts as my two-year-old likes to dance all over them the moment they are laid on the ground.


I am super thankful to Hive 5 for helping me make such a fun quilt for my friend. I hope to mail it this week. She doesn't know it's coming! So it will be a total surprise, which will be fun. And I'm thankful to everyone that pitched in with suggestions and encouragement as I saw this one to the finish--including, but not limited to, my fabulous quilting sensei, K. Because everyone should have a quilting sensei. But you can't have mine. Because she's mine, and poor thing already has to deal with ME!

This is finish #6 from my Q3 FAL list. My pace has slowed a bit, but I'm still making progress, which is practically a miracle. Now, I really need to get tackling some of those other projects--like some sewing for my daughter who will be here lickety-split!

Monday, August 1, 2016

Finished Night Sky Quilt.


Friends, I had crazy plans to take this quilt out in the wild and photograph it somewhere other than my home. But, as you haven't seen every angle available at my home yet, I suppose there is some novelty to my balcony. White railings! Old brick! The sheer fabulousness of it all! I jest, of course, but you know I'm not jesting when I talk about how glorious this quilt is. Friends, this is my first Night Sky quilt (pattern by Jaybird Quilts) and it is scrumptious.

I'm more than a little in love with Jaybird Quilts' patterns. Her Northern Lights pattern is still one of my all-time favorite quilt patterns, and I'm thrilled to have another of her patterns. I'm confident there will be more Night Sky quilts in the future. (I'm already dreaming of one with yummy navy background fabric and perhaps brilliant yellows, oranges, pink, and reds? (AKA, my favorite color scheme.)


While not the easiest quilt I've ever put together--can't beat plain patchwork for that, friends--it did come together with ease. What was really shocking to me was how nicely my angles lined up. It looks like I pinned with serious care and was super careful about every stitch, which we all know is not how this quilter typically operates.

I quilted it with a mixture of straight lines in the white section and some FMQ in the green portions, and it was bound off with a fun green and white stripe.


The back is a stars and planets print that I had chilling in my stash. My older boys are super upset that I am giving this quilt away. They could care less for the front, but HOW DARE I give away this super cool sparkly space print? THE HORROR. (Little do they know, I still have some in stash, and I'll eventually get around to making them something from it.)

For this quilt, I actually shook things up a bit and used a different thread on top that I did in my bobbin. Green and white for the top--blue on the bottom. I was nervous, especially for the white sections, but it worked like a charm.


This is the before-washing shot. If there is one negative to the quilt, it's a bit on the small size for an Audrey baby quilt, but its loveliness more than makes up for that. The entire time I was working on it, I remembered another fun baby quilt I made with a similar palette. There is something about kelly green and crisp white that moves me!

This is my fifth finish for the Q3 FAL, woo! Only eleventy million left to go! Friends, have a lovely Monday, and I hope your August is AMAZING.

Wednesday, July 20, 2016

Maxaloones for C


I am so excited to have these done and mailed before my nephew's birthday. These are from the Max and Meena Maxaloones pattern, which I have had on my to-buy list for forever. They are specifically designed for cloth diaper babies. If you've ever cloth diapered, you understand the struggle to find pants that will fit over that bum. The pattern features three sizes, and all three sizes cover a wide age range. Size 1, which is what I sewed up here, are supposed to fit from three months to three years old. With baby #4 on the way, I'm a huge fan of clothing that will actually fit the kid for more than two hours, know what I'm saying? (Added bonus, I think they are ridiculously cute.)


I used Art Gallery knits for there pants, and friends, everything you may have heard about Art Gallery knits is true. They are SO soft. I'm trying to restrain myself and not buy a huge load of more AG knits for Vanilla. (I do have some planned for her.) I think these are both from Bonnie Christine's Hello, Bear collection, but that could be totally made up.


And these are the pants as worn by my two-year-old. They're for my nephew's first birthday, but I think they'll fit him just fine too. I hadn't planned to make a pair for my two-year-old, but they look so stinkin' cute that I'm pretty sure he needs some too. And maybe my four-year-old. And maybe my six-year-old who is on the small size?? Because why not? I guess this pair of Maxaloones means my fear of knit fabrics has been conquered? They're still not my favorite to sew with, but I'm getting more comfortable with them, for sure.

This is finish #2 from my Q3 FAL list, woo!

LinkWithin

Related Posts Plugin for WordPress, Blogger...